PACKAGING & MERCHANDISING DESIGN | EXERCISES

Yeoh Xiao Shi (0331577)
Packaging &
Exercises
LECTURE
Lecture 1
01/04/19 (Week 1
In the first class, Mr Shamsul briefed us about this module and explain the breakdown of our upcoming projects. Then, we were instructed to find the purpose of packaging and write the answers in Padlet to share among the class.
So, here are the answers I wrote after researching
The purpose of packaging is to protect and preserve the product from damage during the transfer from manufacturer pyhsical
At the end of the discussion, we got to conclude that the five main purposes of packaging are :
Lecture 2
03/04/19 (Week 1
In today's class, Mr Shamsul started it by asking us to think and research about the considerations before designing a packaging. Then, everyone
01. Make the packaging
02. Know your target audience
03. Keep production in mind
04. Packaging
05. Think about the visual elements
06. Materials used
07. Distribution and storage
08. Product should inspire the design package
09. Consider the
10. Pricing and cost saving
11. Contents and message to
12. Important information and labels
13. Know what the product is
14. Create a
15. Stacking and transportation
16. Location of point of
17. Right language
18. Thickness of package
19. Grabbing consumer's attention
20. Typography
21. Quality and functionality
22. How to make the product
23. Measurements and size of the package
24. Marketing strategy
25.
26. Safety of the packaging
Lecture 3 & 4
08/04/19 (Week 2)
Packaging is said to be important as it is part of the marketing to grab the consumer's attention to buy a product. Also, it is the key part in associating a brand to a certain thing. While designing, is it important to know what the consumers want in order to make the perfect packaging and there are many research studies that have been done to study about this. It is found that people would buy the product when the information can be get in a quick and simple way. Other than that, they also expected honesty and authenticity from a product. As for the five main role of packaging, they are function , branding, benefits, features and identification.
Embedded PDF of week 2 lecture slides.
After Mr Shamsul's lecture, one of the group was assigned to present a lecture on the history of packaging. From there, I got to understand how packaging was used from the early days till now and it was quite interesting to see the development.
Embedded PDF of week 2 lecture slides.
Lecture 4 & 5
15/04/19 (Week 3)
This week, Mr Shamsul gave us a lecture about different types and styles of boxes. From the lecture, I manage to have a better understanding on the three most common types of boxes in packaging industry : folding cartons, rigid boxes and corrugated boxes. Also, I got to learn about the two different styles of box which are Reverse Tuck End (RTE) and Straight Tuck End (STE).
Three common types of boxes
01. Folding Cartons
•
•
02. Rigid Boxes
•
•
03. Corrugated Boxes
•
•
•
Two types of tuck top boxes
01. Reverse Tuck End (RTE)
•
•
02. Straight Tuck End (STE)
•
Embedded PDF of week 3 lecture slides.
In the same class, there is also another group assigned to deliver a presentation on the types of packaging and materials. Through their presentation, I'm able to understand what is primary, secondary and tertiary packaging all about as well as various types of packaging and materials used.
Embedded PDF of week 3 lecture slides.
Lecture 6
22/04/19 (Week 4)
This week, a group was instructed to give a lecture about the colours in packaging design which I found is interesting to me. From the lecture, I'm able to look into the importance of colours in packaging design, guides for choosing the right colours for packaging as well as the colour pschology in packaging.
Colour is said to be the most important companents to grab the consumers' attention. It plays a crucial role to get your shopper to see what they want to see, feel and do what the product is supposed to do. Therefore, understanding colour psychology is so important for the success of our brand and packaging. However, poor colour choices will lead to a negative impact.
As for the guides to choose the right colours, we should always choose a unique palette for our packaging as to be different from the competition and to stand out on the shelf. Also, the selected colours should be able to communicate with the appropriate consumers.
Colour psychology is widely used in packaging design as it can be used to influence consumers' emotions and perceptions of the products. Also, colour psychology act as a guide for the designer to choose the right colours for their packaging as different colour associated with different emotions and feelings.
• White : cleanliness, minimalist, safe, basic, conservative
• Black : power, authority, control, elegant
• Blue : trust, honesty, reliability
• Red : energy, action, passion, excitement
• Green : balance, harmony, natural, organic, healthy
• Orange : adventure, optimism, self-confidence, affordability, fun & adventure
• Yellow : joy, optimism, originality, creativity
• Turquoise : clarity of thought, calms the emotions, clealiness and purity
• Purple : high ideals, imagination, spirituality
• Pink : warmth, compassion, comfort, hope
• Brown : strength, solidarity, comfort, earthiness, maturity, reliability
• Gray : conservatism, neutrality, indifference, reserve
Embedded PDF of week 4 lecture slides.
INSTRUCTIONS
EXERCISES
Packaging Analysis (Week 1)
Week 1 (01/04/19)
For the first exercise, we were instructed to go to a supermarket and analysis the packaging by following the checklist provided in Google classroom. To complete this, we would also need to take photographs of the packaging and document them in the Google slides. This exercise was required to be done in group and I have grouped up with Kitty.
Here are the checklist and completed slides below
Embedded PDF of checklist provided in Google Classroom.
Embedded PDF of completed exercise.
Box Making / Dieline Exercise (Week 1 - Week 3)
Week 1 (03/04/19)
For the tutorial class, we were told to bring any items that require a box to support or
To start off, we have to create a prototype for the item chosen and I decided to go with my
 |
| Fig.1.1: Item chose. |
 |
| Fig.1.2: Sketches. |
 |
| Fig.1.3: Sketches. |
Moving on from that, I drew the
 |
| Fig1.4 - 1.9: Process of prototype making. ( |
 |
| Fig.1.10 - 1.11: Outcome of the prototype. ( |
 |
| Fig.1.10 - 1.15: Process of prototype making. ( |
 |
| Fig.1.16 - 1.17: Outcome of the prototype. ( |
Week 2 (10/04/19)
In this week's class, I got to show my prototype to both of my lecturers. They commented that the prototype was
Thus, I decided to make another attempt for the prototype before proceeding to create the
Here are the images showing my third and fourth attempt
 |
| Fig.2.1 - 2.2: Outcome of the prototype. ( |
 |
| Fig.2.3 - 2.4: Outcome of the prototype. ( |
Then, I chose the packaging design that suit the pens better and starts to illustrate the dieline in Adobe Illustrator.
 |
| Fig.2.5: Process of illustrating the |
 |
| Fig.2.6: Dieline. ( |
Week 3 (15/04/19 - 17/04/19)
In this class, I got to show Mr Shamsul and Ms Maria the
With the
Here are some images showing the progress and the final outcome
 |
| Fig.3.1: Process of editing the |
 |
| Fig.3.2: Dieline. ( |
 |
| Fig.3.3: Laser cut process. |
 |
| Final Outcome. |
Week 4 (01/04/19)
This week, we were given an in-class exercise which we were required to design a package / development to be used to hold a special gift. The requirement for this exercise is that we need to develop a name of the gift and a style of writing so that it could be displayed on the package. Other than that, we would also need to design the package with suitable style and colours.
For me, I decided to design a package for a natural botanical perfume. Thus, I started it by searching up for some visual references as to determine the packaging style I want to go with.
 |
| Fig.4.1: Layout of the package provided in Google Classroom. |
 |
| Fig.4.2: Visual References. |
 |
| Fig.4.3: Process of illustrating the pattern in Adobe Illustrator. |
 |
| Fig.4.4: Process of illustrating the pattern in Adobe Illustrator. |
 |
| Fig.4.5: Process of desiging the package in Adobe Ilustrator. |
 |
| Fig.4.6: Process of designing the package in Adobe Illustrator. |
 |
| Fig.4.7: Outcome. (First attempt) |
 |
| Fig.4.8: Final Outcome. |
Embedded PDF of box design exercise.
Thermal Forming (Week 5)
Week 5 (29/04/19)
This week, we were told to bring two to three pieces of A3 plastic sheets along with small rounded objects that can withstand heat for the thermal forming exercise. To start off, we were given a brief and demonstration on how the machine works in the workshop. Later on, each of us would take turns to give it a try.
This week, we were told to bring two to three pieces of A3 plastic sheets along with small rounded objects that can withstand heat for the thermal forming exercise. To start off, we were given a brief and demonstration on how the machine works in the workshop. Later on, each of us would take turns to give it a try.
 |
| Fig.5.1: Setup of the machine. |
 |
| Fig.5.2: Briefing and demonstration by Mr Fendi. |
 |
| Fig.5.2: Briefing and demonstration by Mr Fendi. |
 |
| Fig.5.3: Briefing and demonstration by Mr Fendi. |
 |
| Fig.5.4: My objects. |
 |
| Fig.5.5: Outcome. |
 |
| Fig.5.6: Outcome. |
 |
| Fig.5.7: Outcome. |
 |
| Fig.5.8: Outcome. |
FEEDBACK
Week 1
General Feedback
Specific Feedback
Week 2
General Feedback
Specific Feedback: Mr Shamsul and Ms Maria said my prototype was great, but I could try to make the top part transparent instead of the middle part as to show the
Week 3
General Feedback
Specific Feedback
Week 4
General Feedback : No general feedback given in this class.
Specific Feedback : For the box making exercise, I was told that the box looks a bit rough as compared to my mock up and maybe I could make the box bigger so that the pens fit well. Overall, it is still okay but I could resubmit it if I got time to make a new one.
Week 5
General Feedback : We were told to be careful when using the heating tool because it is very hot.
Specific Feedback : For my objects, Mr Shamsul said it should be okay to withstand the heat since it is made up from the thick plastic and he asked me to give it a try.
REFLECTION
Experiences
Week 1
Week 2: In this week's class, I got to show my prototype to the lecturers. With the feedback given, I proceed to make another attempt on the prototype. While at home, I also start to create the
Week 3
Week 4 : This week, I got to experience with box design which is the thing I always interested in. It is pretty fun for me to look into different packaging designs as to figure out the style I want for my package.
Week 5 : In this class, I got to do the thermal forming exercise which is quite fun but also challenging to me.
Observations
Week 1
Week 2
Week 3
Week 4 : I observed I got to determine the style of the package easier with the visual references gathered. Other than that, I noticed there are some important design details like barcode, size of the product, and more that I need to consider while desiging the package.
Week 5 : I realised I should maintain a distance between the heat and the plastic sheet as the objects will melt if I heat it closely.
Findings
Week 1
Week 2
Week 3
Week 4 : I found that it is important to understand colour psychology before applying the colours to the package as to ensure I have choose the right colour. Also, the colours chosen should be able to convey the message about the product to the target audience.
Week 5 : I found that selecting the right object is important for this exercise as it should be in a simple shape and also able to withstand the heat.
FURTHER READING (WEEK 1-5)
Week 1 - Week 2
 |
| The Ultimate Guide to Product Packaging Design (Online Article) By: Kelly Morr Link: https://99designs.com/blog/tips/ultimate-guide-to-product-packaging-design/ |
(Week 1)
This week, I have read an article which called "The Ultimate Guide to Product Packaging Design" through online. This article included the factors that a designer should take into consideration before starting the packaging design, the process of designing a packaging and the packaging design glossary.
There are three factors that we need to know before starting design the packaging for a product : what is the product, who's buying the product and how are people buying the product. Firstly, understand what is the product about is going to help us determine if there are any logistical musts for that particular product packaging. Secondly, we have to know who that consumer is as a product's packaging should appeal to its ideal consumer. Thirdly, it is also important for us to know the consumer behavior like whether they purchase it in a supermarket, a small boutique or through online as the packaging will be different if the product is going to be sold online and shipped than if it's going to display on the store shelf. Moving on from that, there are also few information that a designer need to collect (colors, fonts, logo, written copy, imagery, required marks and style preferences) as well as things to be considered before the design process (budget).
Once all the information has been gathered, it is now the turn to start the design process. According to the author, there are seven steps in designing the packaging. First, we need to understand the packaging layers : outer packaging (first thing a customer is going to see), inner packaging (keeps the product safely in the outer packaging) and product packaging (label, tag, wrapper and so on). Next, choose the right type of a packaging and understand the requirements for printing (dielines , file format requirements, colour
(Week 2)
During the previous week, I have read about the guide before starting to design a packaging and the process of designing. From the same article, I will be continuing reading for the packaging design glossary which is some common packaging design terms this week.
Adobe Illustrator (AI) file
Barcodes (UPC and EAN): Groups of lines on any package that have machine-readable data to store information about the product, including price. There are different types of
Bleed
Canister: A round and cylindrical container that made of metal and used for storing things like food and chemicals.
CYMK
RGB
Pantone
EPS
Digital Printing
Offset Printing
Raster file type
Vector file type
Week 3
 |
| Packaging Essentials: 100 Design Principles for By: Roncarelli, Sarah, Ellicott, Candace |
This book is filled with examples of inspiring package design, design features, applications, and useful tips. It includes the contents about design challenge, design considerations, design process and more for the readers to understand about basic principles for creating the packages. Through this, I have read about the design considerations.
The authors include the main four things that a designer should consider when it comes to design the packaging which are materials, form and shape, labels and printing. First of all, they discussed about the materials. It is said that well-chosen package materials add to the visual experience, provide tactile interest, reduce (or increase) the costs, and increase (or decrease) environmental impact. They suggested the designers to research the options and seek for the package's potential. The next thing that should take into consideration is form and shape. A package shape is a fundamental part of brand's characteristics. It delivers messages about the product and provides a memorable foundation on which visual and emotional values are laid. The fact that a bottle shape can be trademarked and registered is proof of its perceived value.
Other than that, a designer should also consider about the labels. Usually, the shoppers will spend five to seven seconds to scan a label on the shelf. As to ensure that the label is read, the designer must consider the package's competition. A different and unfamiliar label will stand out on the shelf and grabs the customers attention to pick up the product. Lastly, printing is also one of the things that need to be considered. There are different types of printing methods for packaging. Hence, the designer would need to understand and think of the methods that suitable for their design.
 |
| Packaging & Dielines : The Designer's Book of Packaging Dielines By: Andrew Gibbs |
This e-book contains various structural designs and dielines for packaging standards that will be useful for the students and designers in exploring the packaging design. Each dieline in the book comes with a photo, brief description and basic guidelines to illustrate the structure and it become a quick reference for packaging designers. Through this, I'm able to look into different style of packagings with their dieline which got to give me some inspirations for my project 1.
Here are some paper bag design I found from this book as my reference :
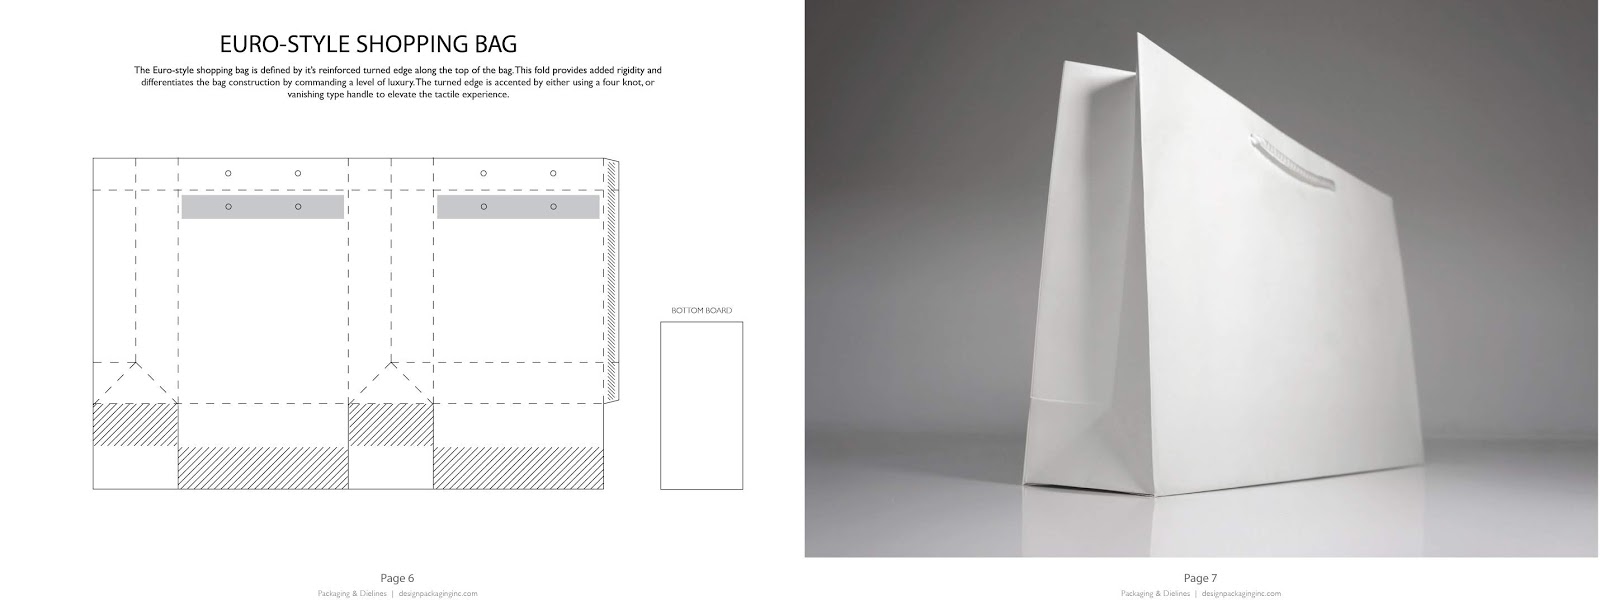 |
| Euro style shopping bag. |
 |
| Diecut handle bag. |
 |
| Diecut handle bag with flap. |
 |
| NWPP tote bag. |
 |
| What is Packaging Design? By: Gilles Calver |
This book descontructs the component parts of packaging design by discussing how each component like structure, information layout, hierarchy, photography and illustration are used in isolation and related to each other. Different visual references are also included in the book for the readers to have a better undertanding. From here, I have read about the colour used in packaging design.
According to the author, colour has many applications in packaging design. Firstly, it can be used as part of a brand's identity as to define a brand visually. When a colour has been used for a brand consistently over the time, it becomes "owned" by the brand to such an extent that when a consumer sees the colour, they could immediately associate it with the brand. Secondly, colour can be used to differentiate a product in its competitive set. It becomes an important visual discriminator for the product to stand out from others on the shelf. Thirdly, colour is also used to differentiate the products in range. When a range has two or three products or over a hundred, a colour can be applied to each type of the product to enable the consumers to make the easy distinction. However, it is said that the selection process may be compilcated by the complexity of the range hierarchy when there is much larger ranges.
Comments
Post a Comment